Automate Cisco IOS/IOS-XE documentation with Ansible (with examples)
Note: This post integrates several automation tools at once. My objective is to provide some well-documented, concrete examples of executable Ansible Playbooks, D2 Diagrams, and best practice to illustrate ways to make good documentation easy.
Note: All code examples in this blog post are structured in a format to be complete and executable. They don't necessarily represent best practice (e.g. including passwords), but are intended as a functional starting point for Ansible beginners
Ansible Setup
Welcome to the messy world of network automation! If you're familiar with Ansible itself, there are a few things you'll need to understand to effectively use the tool:
- Validate Idempotency: First and foremost, Ansible network automation differs the most from main-line systems automation here. The responsibility for making a module idempotent, e.g. safe for re-execution requires a substantial amount of effort, so you'll often see restrictions on module use. Testing any modules used in an enterprise should be a matter of practice, and it applies doubly here.
- Authentication is weird: Credential storage is more complex with Ansible network modules, with many vendors implementing things their "own way". It's being reined in, and the examples used here are IOS-XE, which follows the standard.
- Secrets: In production, use Vault or something similar to store credentials. Most Network OSes don't support SSH key authentication, which is the typical method for Ansible.
Ansible Inventory
Things get opinionated on how to store an inventory. Ansible's documentation is going to be the most up-to-date and best, but it boils down to a few choices:
inivsyamlformat. It's your file, use what's easiest. I consistently chooseyamlfor the easy object hierarchies- Organization: Build a document plan to decide what hosts will be installed where, and how to name them. Whiteboard-grade is the best
In this example, we'll take a new yaml inventory and apply it. There's more to the inventory, but the top-level hierarchy is the same. yaml and json files start with a top-level dictionary, and yaml prefers a start-of-file line (---):
 1---
 2cml_ios_xe_machines:
 3  hosts:
 4    AnsLabIOSXEv-1:
 5      ansible_host: "10.7.3.10"
 6  vars:
 7    ansible_network_os: "ios"
 8    ansible_user: "admin"
 9    ansible_password: "cisco"
10    ansible_become: "yes"
11    ansible_become_method: "enable"
12    ansible_connection: "ansible.netcommon.network_cli"
Let's cover what each of these fields does, and how it serves us:
cml_ios_xe_machinesserves as a root dictionary key. Use this name under thehosts:directive in an Ansible playbook to automatically pick up that inventory object.hosts:defines the inventory group members.AnsLabIOSXEv-1:defines an individual node as part of this inventory group. It'll use this name, and if it's resolvable via DNS, you don't need to specify anything else.ansible_host:enables a user to set a specific IP address for a given node. Since this particular box is in CML and is frequently wiped/replaced, I just keep the records here.
vars:enables an Ansible administrator to automagically set variables available on every instance invoking this inventory. They don't have to be required by the module, we can setfoo: 'bar'here if we want.ansible_network_os:instructs Ansible on which NOS the node runs, instead of relying on automatic detection.ansible_user:needs to be set somewhere, as authentication via SSH is required, even on CML nodes.ansible_password:Don't do this in real life, full stop. There are methods for acquiring secret input in an Ansible playbook that are better, but they aren't self-contained.ansible_become:instructs Ansible that an additional command will be required to achieve escalated privileges.ansible_become_method:instructs Ansible on what command achieves escalated privileges.ansible_connection:instructs Ansible on what driver to use for CLI interaction, in this caseparamiko
Configuring Cisco IOS with Ansible
After firing up the CML nodes required for this lab, I was quickly reminded of how frustrating the old Cisco IOS CLI really is - let's build a tool that will configure interfaces worth diagramming.
We're going to run into issues here - there isn't a cisco.ios module for Layer 3 802.1q subinterfaces. This is resolvable with a Jinja2 template, but is no longer idempotent. To use this template, simply place it in the same directory as the Ansible playbook:
1{% for i in ios_interfaces %}
2interface {{ i.name }}
3  encapsulation dot1q {{ i.tag }}
4{% endfor %}
This is a simple example of Jinja2 looping - the {% for i in ios_interfaces %} stanza receives input from the Ansible playbook as part of vars. The iterator (i) in this example will contain whatever is stored in vars (a dictionary), and can be invoked without dictionary traversal, e.g. {{ i.name }}.
Let's try a playbook to configure some interfaces:
 1---
 2- name: "IOS Gather Facts"
 3  hosts: "AnsLabIOSXEv-1"
 4  connection: network_cli
 5  gather_facts: yes
 6  vars:
 7    ios_interfaces:
 8    - name: GigabitEthernet4.100
 9      tag: 100
10      ipv4:
11        address: 10.10.100.1/24
12    - name: GigabitEthernet4.101
13      tag: 101
14      ipv4:
15        address: 10.10.101.1/24
16    - name: GigabitEthernet4.102
17      tag: 102
18      ipv4:
19        address: 10.10.102.1/24
20    - name: GigabitEthernet4.103
21      tag: 103
22      ipv4:
23        address: 10.10.103.1/24
24    - name: GigabitEthernet4.104
25      tag: 104
26      ipv4:
27        address: 10.10.104.1/24
28  tasks:
29    - name: "Set Interface Config Sheet"
30      template:
31        src: ios_subinterfaces.j2
32        dest: '{{ inventory_hostname }}.conf'
33    - name: "Apply Layer 2 Configuration"
34      cisco.ios.ios_config:
35        src: '{{ inventory_hostname }}.conf'
36    - name: "debug"
37      debug:
38        msg: '{{ item }}'
39      with_items: '{{ ios_interfaces }}'
40    - name: "Set Interface IPs!"
41      cisco.ios.ios_l3_interfaces:
42        config:
43        - name: '{{ item.name }}'
44          ipv4:
45            - address: '{{ item.ipv4.address }}'
46      with_items: '{{ ios_interfaces }}'
With this playbook, I invoked the specific node AnsLabIOSXEv-1, because the playbook itself includes unique data. Ansible also supports injecting variables from a separate file, e.g. ansible-playbook {{ playbook_name }} --extra-vars "@file.json".
The vars structure is doing most of the heavy lifting here - defining each interface for configuration in a concise, readable format. This may follow stricter formatting, making it the "Model" portion of the Model-View-Controller architecture.
If you have troubles coming up with a structure for your data, or constant revising causes issues, check out Openconfig for vendor-neutral, well-organized models.
tasks is where the actual work happens:
templateis Ansible's Jinja2 driver, and will takevarsand combine them with any file template chosen by the user.cisco.ios.ios_configis the "fall-back" method for device configuration, used here due to a lack of subinterface support. It's not idempotent.debugallows an engineer to print any internal variables provided either by automatic data collection or by the user directly. I included it here to provide an example of "debugging" tools, and because I like Ansible playbooks that "repeat back" to me prior to executing.cisco.ios.ios_l3_interfacesenables idempotent configuration of Layer 3 interfaces, with some restrictions on name (shortened names are not idempotent!)
Running the playbook is fairly straightforward (truncated):
1ansible-playbook set_interfaces_anslabiosxev-1.yml
2TASK [Set Interface IPs!] ******************************************************
3ok: [AnsLabIOSXEv-1] => (item={'name': 'GigabitEthernet4.100', 'tag': 100, 'ipv4': {'address': '10.10.100.1/24'}})
4ok: [AnsLabIOSXEv-1] => (item={'name': 'GigabitEthernet4.101', 'tag': 101, 'ipv4': {'address': '10.10.101.1/24'}})
5ok: [AnsLabIOSXEv-1] => (item={'name': 'GigabitEthernet4.102', 'tag': 102, 'ipv4': {'address': '10.10.102.1/24'}})
6ok: [AnsLabIOSXEv-1] => (item={'name': 'GigabitEthernet4.103', 'tag': 103, 'ipv4': {'address': '10.10.103.1/24'}})
7ok: [AnsLabIOSXEv-1] => (item={'name': 'GigabitEthernet4.104', 'tag': 104, 'ipv4': {'address': '10.10.104.1/24'}})
8PLAY RECAP *********************************************************************
9AnsLabIOSXEv-1             : ok=5    changed=2    unreachable=0    failed=0    skipped=0    rescued=0    ignored=0
The above command is a re-run, but note how there are 2 changed tasks. This is an indicator that a change is not idempotent.
Generating IOS Documentation with Ansible
Now, we finally have a router to automatically document.
As part of the playbook process, Ansible will try and gather a number of details about the system it intends to change. These facts aid idempotency but also provides important context in a way that's easy to tap for automation engineers. Our previous instructions in the inventory provided Ansible important context, so most of the data required to auto-document will already be there.
This playbook will collect all possible supported information about a node and print it without logging in to the node. Handy, isn't it?
 1---
 2- name: "IOS Gather Facts"
 3  hosts: "cml_ios_xe_machines"
 4  connection: network_cli
 5  gather_facts: yes
 6  tasks:
 7    - name: "Collect Data"
 8      cisco.ios.ios_facts:
 9        gather_subset: 'all'
10      register: 'ios_deadbeef'
11    - name: "Print Data"
12      debug:
13        msg: '{{ ios_deadbeef }}'
Note that the Jinja2 escaping ('{{}}') is required to print a variable with the debug -> msg combination.
I'd rather not hand off Ansible playbook logs to other engineers, clients, and executives as network documentation, though. Let's try to make something pretty with Jinja2 and D2, starting with a definitely not confusing .j2 file:
 1'{{ inventory_hostname }}': {
 2  icon: 'router.png'
 3  interfaces: |md
 4{% for i in ansible_facts.net_interfaces|dict2items %}
 5{% if i.value.ipv4|length %}
 6    * {{ i.key }}: {% for ii in i.value.ipv4 %}{{ ii.address }}/{{ ii.subnet }}{% endfor %}  ({{ i.value.type }})
 7{% endif %}
 8{% endfor %}
 9  |
10}
This Jinja2 template will be universal to any router it's executed on, and print all interfaces with ipv4 addresses. We're also using |dict2items because the key for i isn't visible otherwise. It formats the dictionary like so:
1{
2    "key": "name"
3    "value": {
4        "key": "stuff"
5    }
6}
Rendering a D2 document will require several stages:
- Collect data from IOS node (implicitly collected by
gather_facts: yes) - Template the D2 definition
- Render the D2 definition
After all that work, this is all that's required to auto-document an IOS node:
 1---
 2- name: "IOS Gather Facts"
 3  hosts: "cml_ios_xe_machines"
 4  connection: network_cli
 5  gather_facts: yes
 6  tasks:
 7    - name: "Use facts to draw a node diagram"
 8      template:
 9        src: 'node_diagram.j2'
10        dest: '{{ inventory_hostname }}.d2'
11    - name: "Render node diagrams!"
12      ansible.builtin.shell: 'd2 "{{ item }}" "{{ item }}.png" --sketch'
13      with_fileglob: '*.d2'
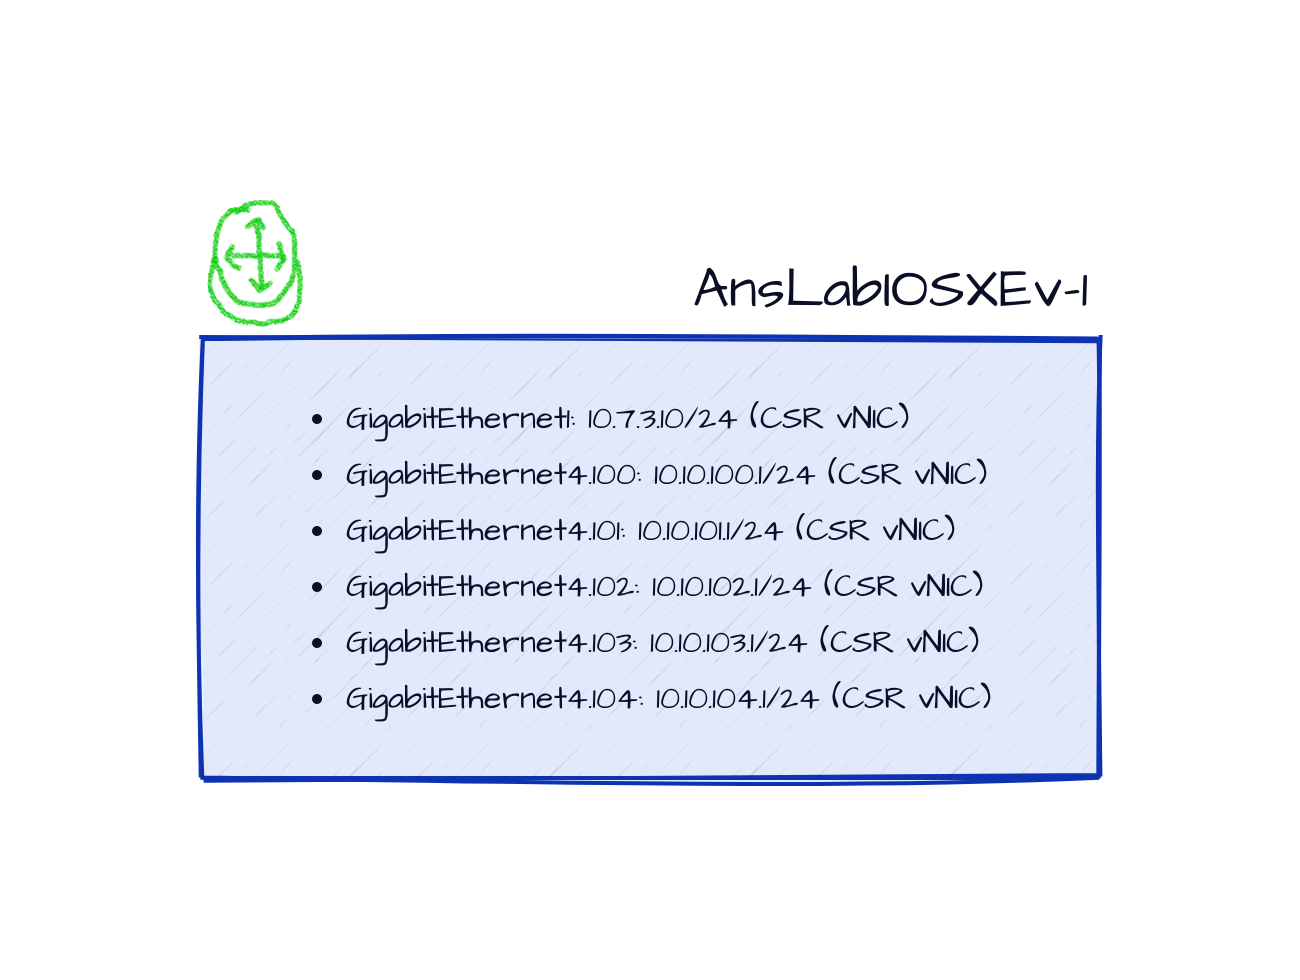
With the tool provided, it'll generate a network diagram node (as always with the glorious Crayon Visio stencils):
Conclusions / Lessons Learned
Network Engineers tend to be pretty rigid about standards - which lends itself to this type of automation. The examples in this blog post are designed to scale - it'll generate hundreds of images if given hundreds of IOS nodes, saving unimaginable hours of time.
In the future, I'd expand the scope of templating far beyond a simple diagram. Auto-generating HTML, Markdown, Microsoft Word documents (if you must) are all well-supported by Jinja2 - it just needs to be available as text somehow. There's a distinct beauty to providing solution delivery complete with unique, use-case customized documentation every time.
I can see full operating manuals and nighttime procedure runbooks being delivered to IT consumers using the simple methods outlined here - it's a bright outlook for tomorrow's IT service quality.
Posts in this series
- Document vSphere as Code with D2!
- Document Networks as Code with D2!
- Automate Cisco IOS/IOS-XE documentation with Ansible (with examples)